Adding LinkSentry to your WordPress website
Learn how to integrate LinkSentry monitoring into your WordPress site using the WPCode plugin in just 5-10 minutes.
If you have ever adopted any tool that involved adding JavaScript code to your WordPress (something like Google Analytics), then you already know how to adopt LinkSentry! If not, follow along with us and within 5-10 minutes, LinkSentry will be monitoring and safeguarding all your external links.
If you are using another CMS, chances are that there already exist multiple plugins/modules that allow you to add custom HTML/JavaScript code to your website. In that case, pick one with good ratings and reviews and go directly to the second part of this guide. If you don't know what your CMS supports or doesn't support and you are interested in adopting LinkSentry, contact us at [email protected] and we'll help you out!
To be able to follow along with us, we assume the following:
- You have an active LinkSentry subscription
- You can log in to the administrative panel of your WordPress site
Part 1. WordPress Plugins and You
WordPress has a rich ecosystem of plugins that allow you to customize your website to your heart's desire. For our purposes, we will be installing a well-rated and no-cost, third-party plugin that allows you to add JavaScript code on every single page of your WordPress site.
Remember: LinkSentry uses crowdsourcing to collect all your external links. If you don't add LinkSentry's monitoring code to a page of your site, we won't be able to discover and track the links available on that page.
Log in to the administrator panel of your WordPress site. Once you successfully log in, you should be able to see something like this:

Click the icon of a plug from the left-side menu, which should get you to the Plugins page.
Depending on how much you rely (knowingly or not) upon plugins, that page may already list one, two, or multiple already installed plugins.
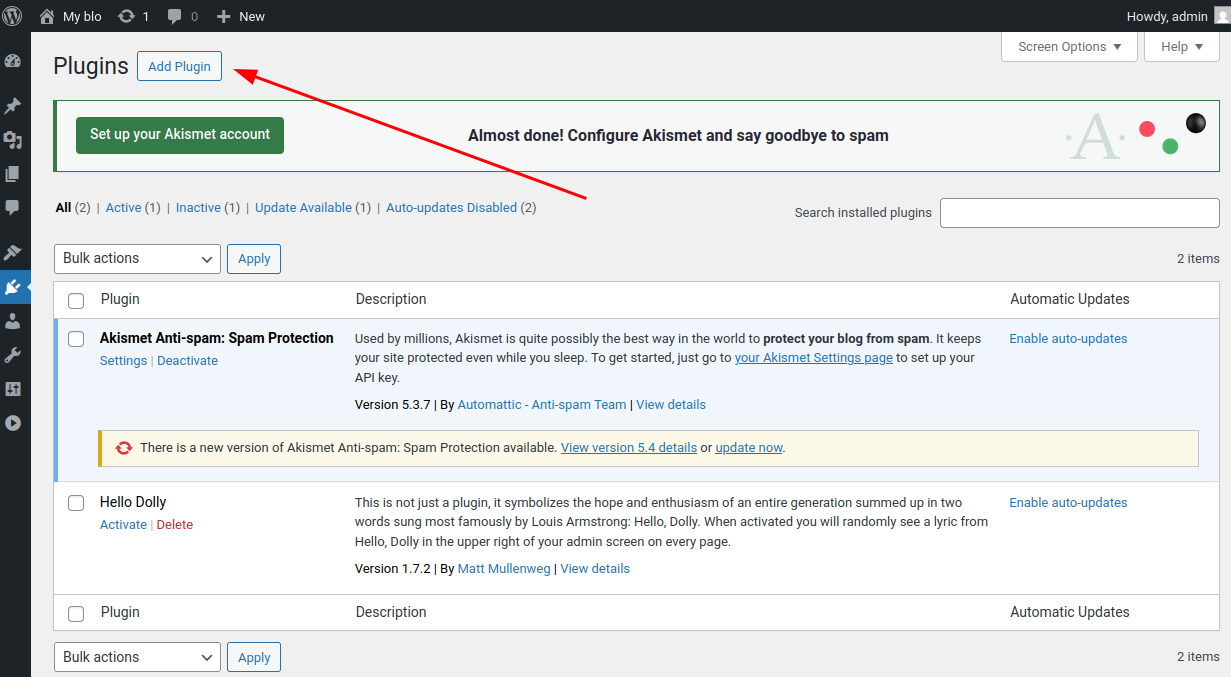
Click on the button that says "Add Plugin" located near the top-left of this page.
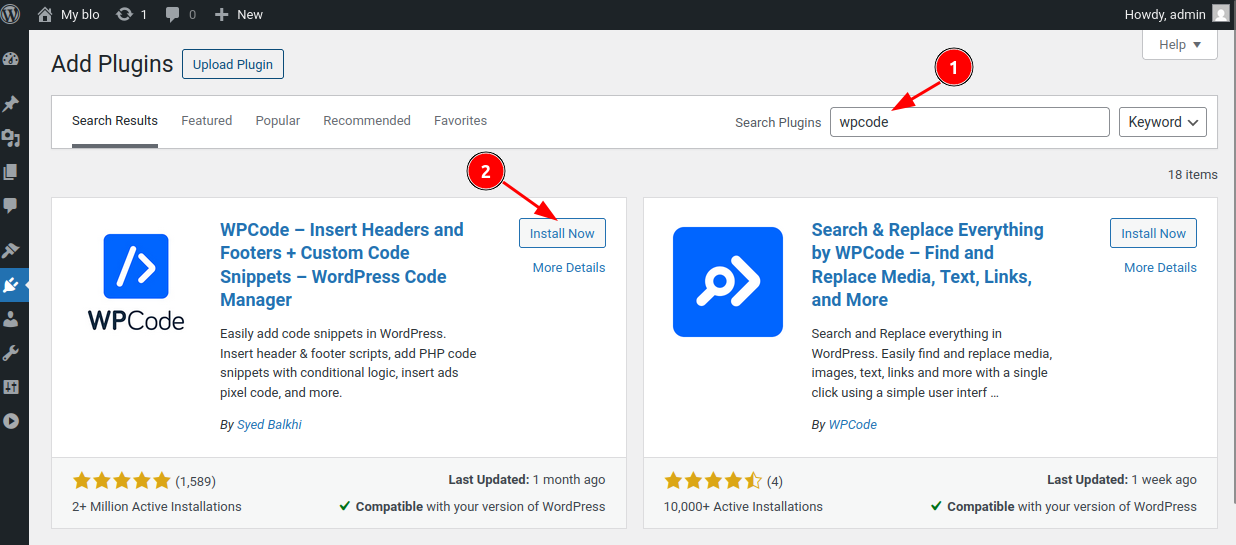
On this page, type "wpcode" in the Search Plugins box, and hit Enter. The WPCode plugin should be the first search result which you can install by merely clicking on the Install Now button, as shown below:
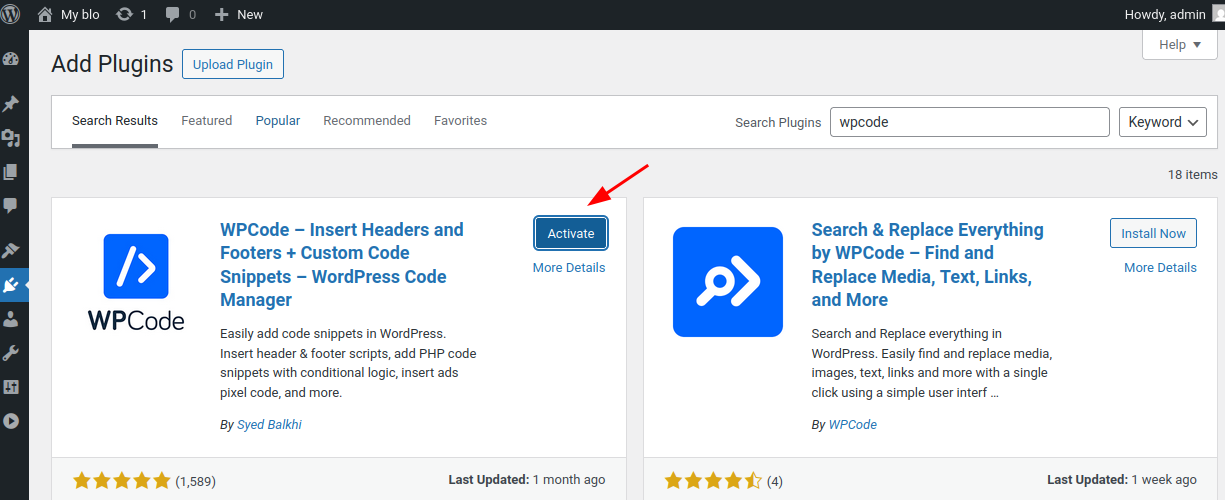
Once the plugin is installed, make sure you activate it by clicking on the Activate button:
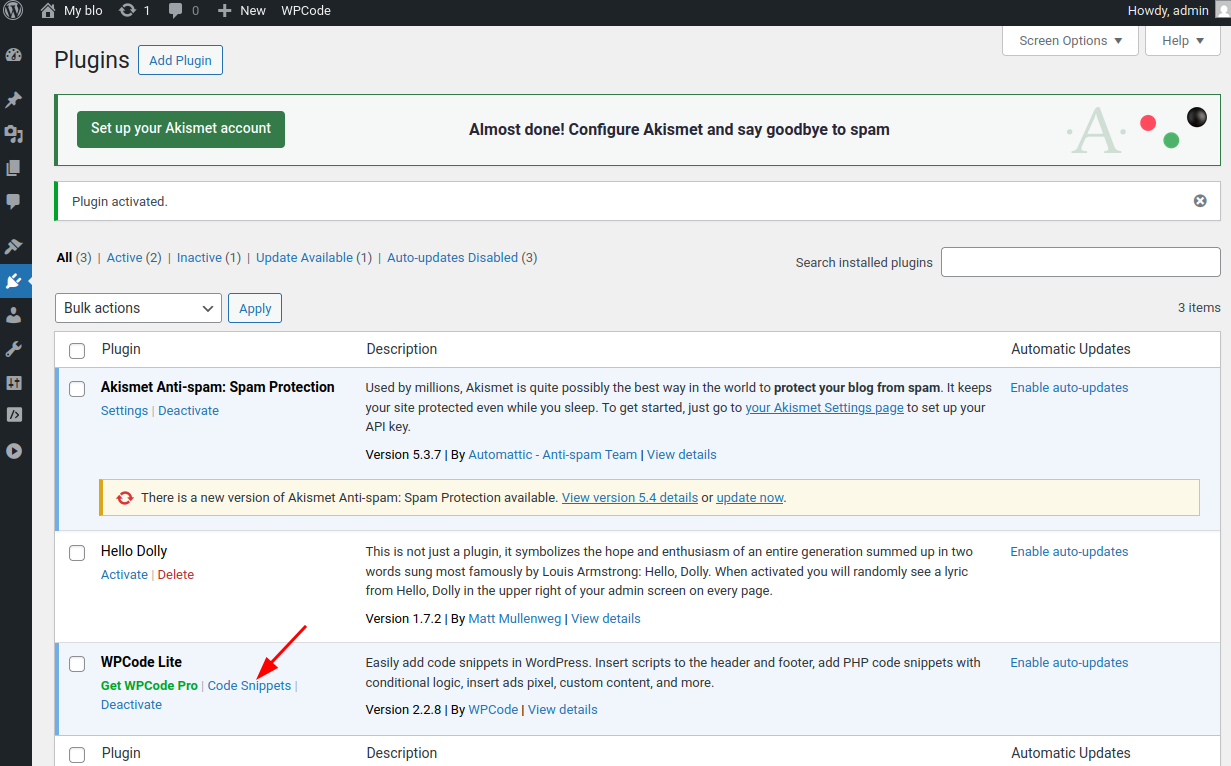
This should automatically bring you back to the plugins page where you should now be able to find the newly-installed WPCode Lite module. Click on the Code Snippets link of that new entry, as shown below:
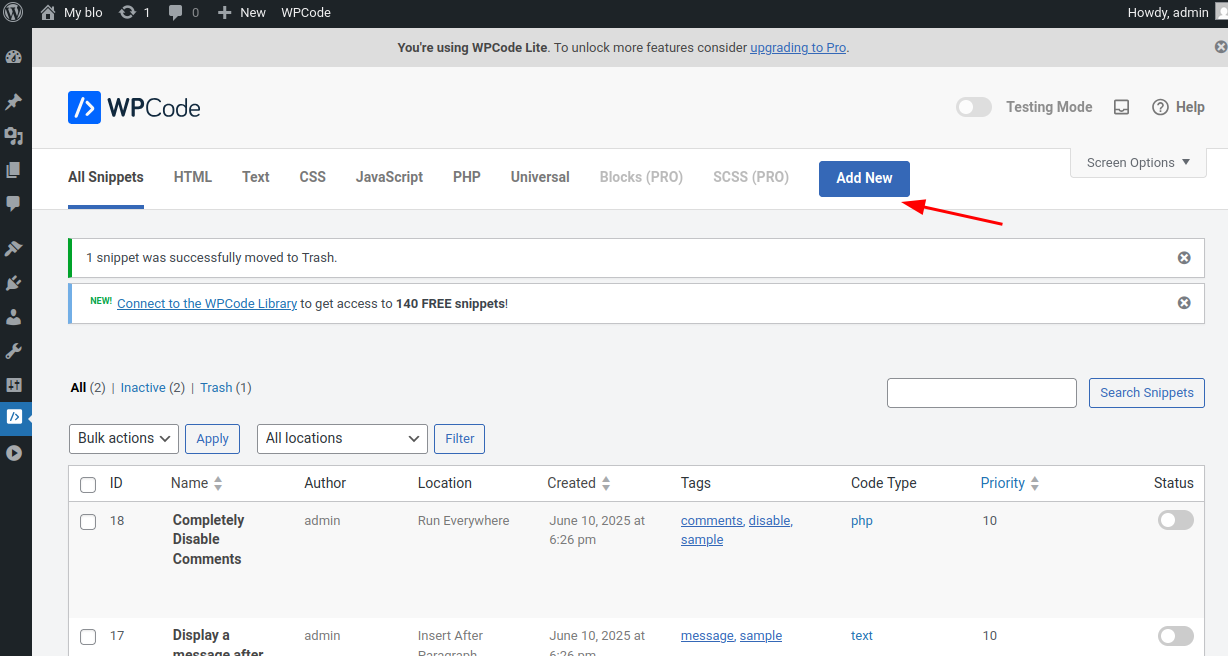
Once you are navigated to the main menu of the WPCode Plugin, click on the Add New button near the top right of that page.
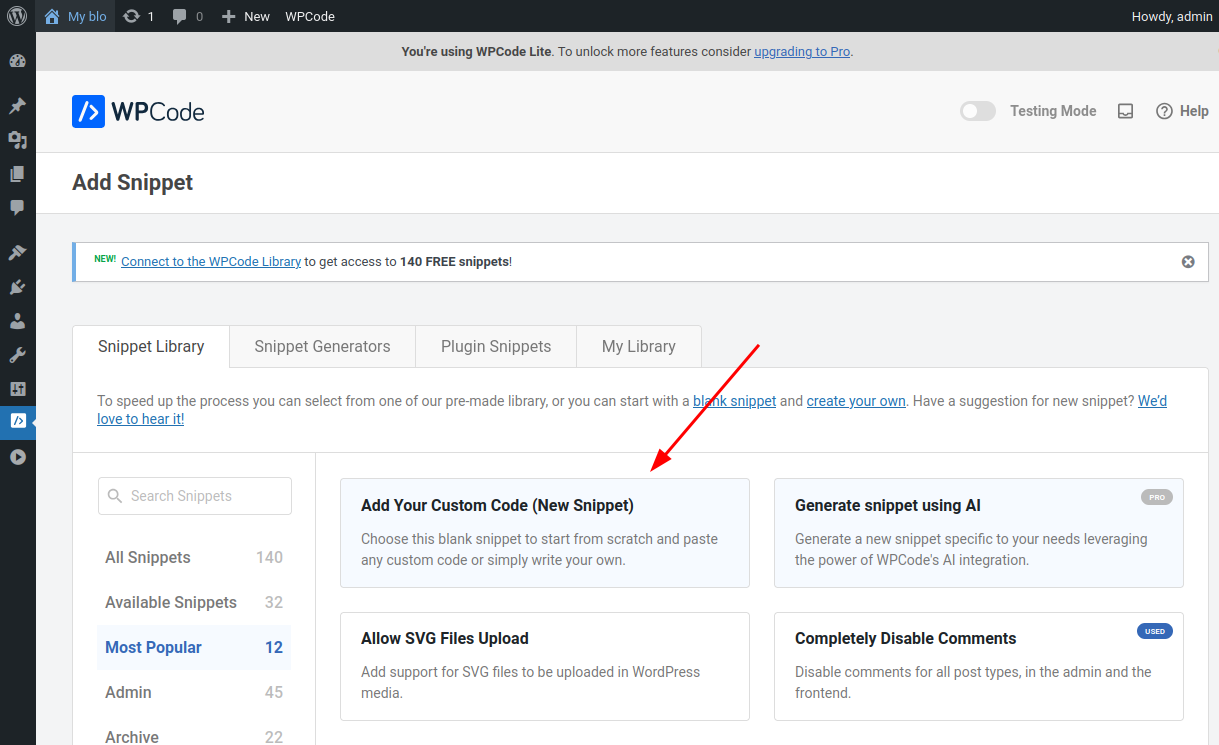
We will be adding custom code from the LinkSentry dashboard, so go ahead and click on the Add Custom Snippet button that will appear once you hover your mouse over the Add Your Custom Code (New Snippet) option:
We will be adding LinkSentry's JavaScript code so make sure you choose the JavaScript Snippet option from the menu on the bottom of the page:

We are now a few clicks away from enabling LinkSentry on your site!
Choose a descriptive name for this new snippet (e.g. "LinkSentry Monitor" or "I love LinkSentry"... your choice really) and then, in a new tab of your browser, navigate to your LinkSentry account on linksentry.io.
Part 2. Get the link-discovering magic from your LinkSentry dashboard
As mentioned in the beginning of this guide, you'll need an active subscription to use LinkSentry. If you don't have one, you'll have to get one at this point. Worry not! We give you a no-strings-attached, 7-day free trial and the ability to cancel your plan at any point (though we are confident you'll love LinkSentry as much as we do). Check us out here: https://linksentry.io/pricing
Once you log in, click on the "Websites" link of the LinkSentry dashboard. If you haven't already added your website on LinkSentry, just fill-in the domain name, give it a name if you so desire, and click on the "Add Website" button.
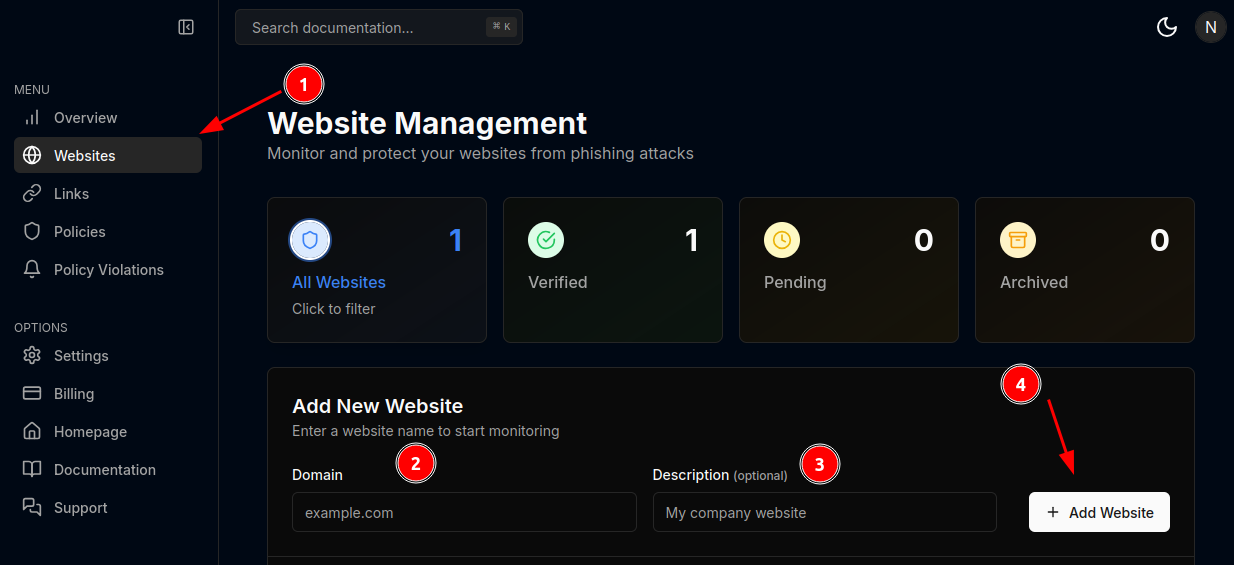
Follow any instructions for verifying the ownership of your site until your new site appears in the list of Registered Websites with a "Verified" tag.
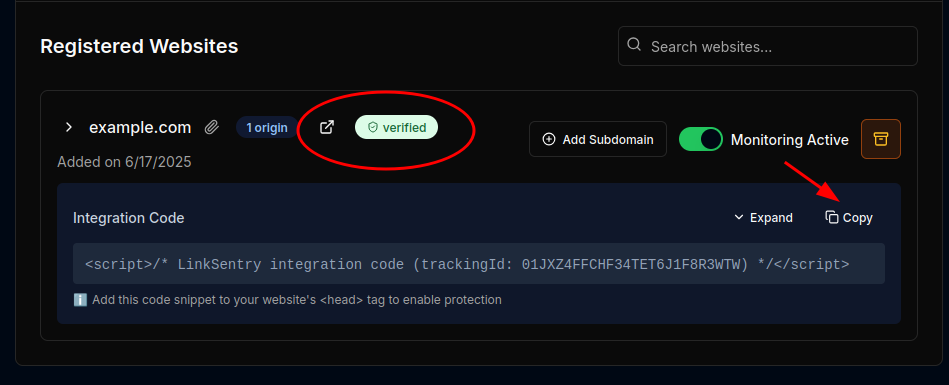
LinkSentry has now created the JavaScript code that's unique to your site. Click on the Copy option which will copy the code to your clipboard.
Part 3. Putting it all together
Now, go back to your tab on your WordPress site and paste (Ctrl-V) the LinkSentry code into the open code snippet, as shown below:
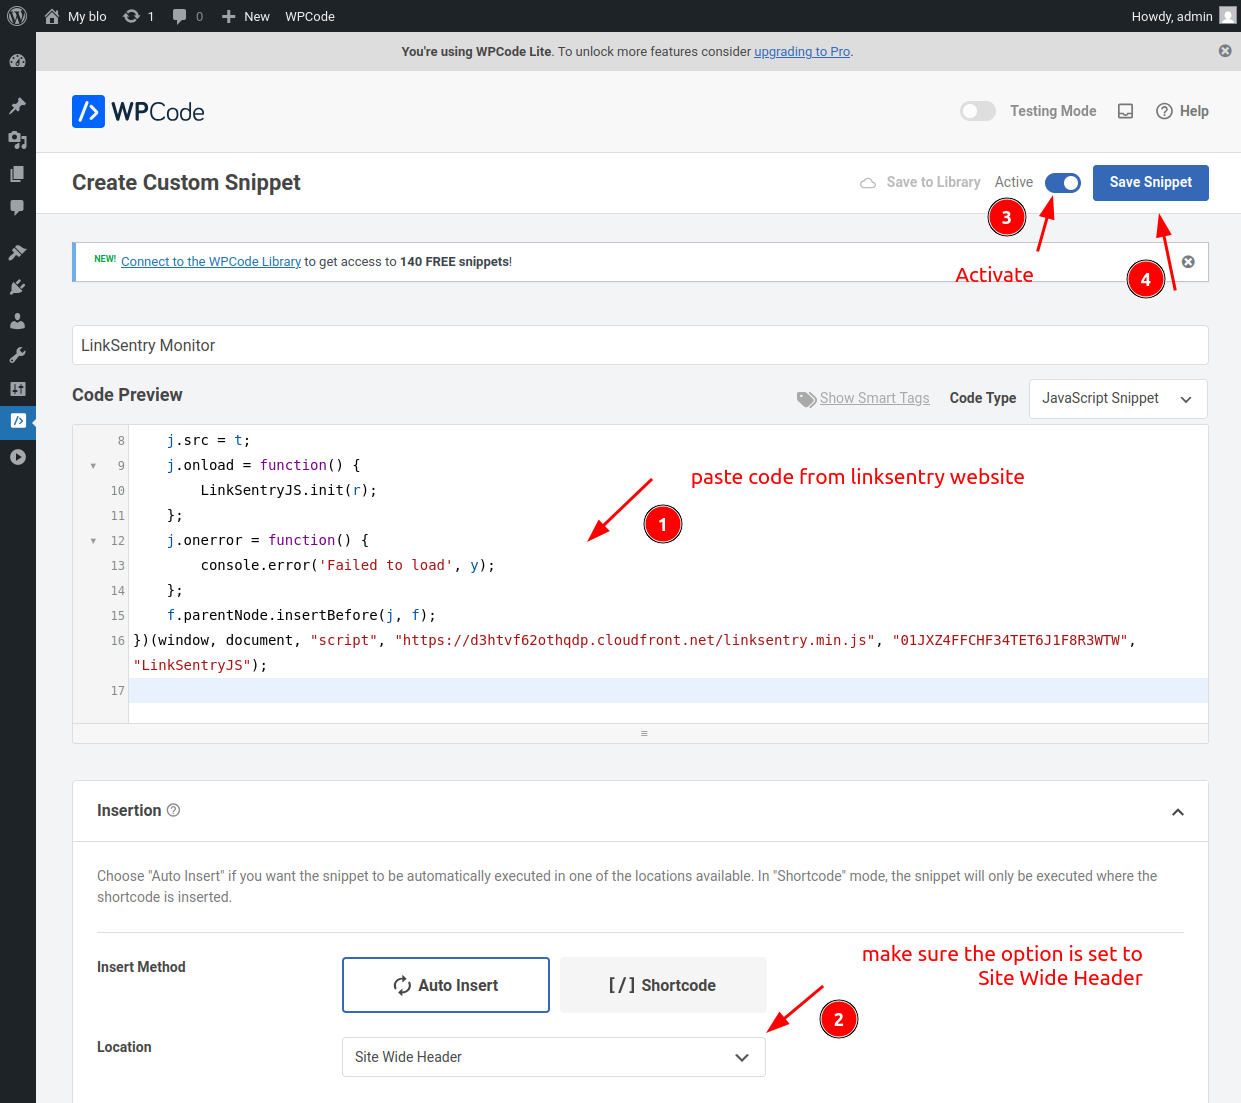
Double check that the Location Option is set to "Site Wide Header" (to ensure that the LinkSentry code is added on all current and future pages of your WordPress site). Toggle the switch on the top-right to "Active" and then click on the Save Snippet button.
Before you pat yourself on the back, let's verify that the code is indeed loading on your WordPress site. Navigate to your site (main page or any other page, as long as you enabled the "Site Wide Header" option from above) and then either hit Ctrl-U to view the HTML code of your site, or right-click on your page and choose "View Page Source."
In the HTML code that your browser shows you, search for the LinkSentry snippet (e.g. by hitting Ctrl-F and then starting to type "linksentry"). Once you confirm that your code is there, you are really done.

Now is the appropriate time to pat yourself on the back.
Conclusion
Over the next 24 hours, you should start seeing all the links that LinkSentry is discovering on your website on linksentry.io as well as which links violate the policies you have enabled (e.g. low-quality links, NSFW content, malicious content, broken links, etc.) With LinkSentry's help, you can now zero-in on problematic external links and remove them or replace them with good ones. What you just did was a one-time process and you'll never have to do it again.
Welcome to the LinkSentry family!